Sunday, March 31, 2013

Machine Binding

Washer-friendly machine binding, ready for action
I think I'm in the minority here, but I really love a machined binding. I'll admit that my appreciation stems from living in a home where machine-washing isn't optional -- it is an absolute necessity. Having two cats (one of whom is morally opposed to good hygiene) , a dog, and a toddler under foot will do that to you. Unfortunately, I learned the hard way that sewing the binding on by machine is more than a little tricky. Just look at my earlier quilts.

But I think I finally cracked the code on my SeasScapes Quilt. There was definitely a lot of practice involved, but a few changes to my machine's settings really made things much easier. After so much experimenting, I thought it would be good to write up what I did this time -- both for myself and for anyone else with a Janome Horizon.

But first a little background. I'm using Rita @ Red Pepper Quilts' binding tutorial. With her technique, the binding stitches are almost invisible from the front, and look like decorative top-stitching from the back. It's seriously ingenious.

Binding and the quilt, both zig-zag stitched and ready to go
Like Rita, I prefer a narrow binding. I start with 2.25 inch strips, sewn together and pressed in half. If you don't like that look, feel free to use 2.5 inch strips. Starting about 15 inches into the strip, run a zig-zag stitch down the unfinished/outside edges of the binding. I also choose to run a zig-zag stitch around my trimmed up quilt. Not only does it prevent fraying, but it prevents the layers from sliding around when you fold over the binding. Sure, all the safety stitching takes a few extra minutes, but it's a good insurance policy. Well worth it in my book.

Next attach the binding to the front of the quilt. I use my quarter-inch accufeed foot for this phase. I also put my machine on a piecing stitch (#93 on the Horizon), set to a scant quarter-inch seam allowance (needle position at 6.5 on my particular machine). When it's time, join the ends together exactly as Rita describes (I swear I'll be going to her site to look that up until I'm 120 years old). Then press the binding over, using a little steam.

This is where things get a little intense, but here is the basic premise: You're going to fold over the binding, stitch in the ditch from the front (the "ditch" here being where the binding meets the quilt top), and "catch" the binding on the backside. Catching the binding on the back is entirely blind. And entirely terrifying the first time you do it. But, once you get a little practice, it won't be so bad. Promise!


To make the whole ordeal infinitely easier I use  Clover Wonder Clips. They hold things perfectly  and don't distort the fabric like pins do. Oh, and they won't poke you, either. Treat yourself to a 50-pack and you can thank me later.

But anyway... fold your binding over to the back, nice and tight, clipping every two inches or so. The clips have marks on the back (the clear side) which I use as a guide to make sure that there is a generous 1/4+ inches of binding on the back. Remember that you'll be "catching" the binding on the back, so it's important that you're consistently over 1/4 inches on the back. Anything less than a quarter-inch means you'll "miss" the binding, causing a bit of a headache.

Once you have a good section of binding clipped down, it's time to make a few small changes to your machine. I switch to my open toe foot for accufeed, and turn the foot pressure down to "3." If you don't have an accufeed foot, don't worry. Any open toe foot that lets you see what's going on is just fine. I keep my machine stitch settings the same as before, but depending on the density of your quilt you may need to adjusts the needle position a bit (more on that in a minute). Now, take a deep breath. It's time!

Get your quilt comfortably on the machine bed, and put your needle "in the ditch" between the quilt top and the binding. If you can't get your needle in the ditch because your binding is being flattened, reduce your foot pressure some more. Now, put your needle down and pull up the bobbin thread. I like to tie the threads off and bury the knot, but you can do whatever you're more comfortable with. Take a few stitches and "feel" the back of the quilt with your hand to make sure you're catching the binding. If at some point you notice that you've missed the binding, try to get back on track and then go back and fix the gap with a second pass.

When you get to a corner, get as close as you can before pivoting. I recommend using a seam ripper to nudge the binding out of the way of your needle.

And that's really all there is to it! Just keep chugging along until you're done, and then enjoy machine-washable, pet proof quilty goodness!


Sunday, March 24, 2013

Done!


Well, I made it!  My Seascapes coin quilt is bound, washed, and perfectly crinkly.


And as luck would have it, today was a gorgeous day for a photo shoot. It was almost too sunny for pictures, but after one hundred inches of snow...  I'm not complaining. Not.one.bit.

The sun was trying to melt the last of the snow. Hopefully this is the last quilt-on-snow photo for awhile!

And now it's time for a self-imposed break. Rushing through two quilts in six weeks was a little much, and I need to recharge. That won't stop me from planning my next project though :)

Friday, March 22, 2013

A Good Day

Today was a rare treat -- an entirely child-free day off of work! I sewed my little heart out and loved every second of it!

With my deadline looming I focused on my seascapes quilt. I finished the quilting first thing this morning and then squared things up. Once it's all trimmed up, you can really see the finished product  coming together. The whole process leaves me a little giddy :) And I was pleasantly surprised with the finished size on this one-- a pretty generous throw at 72" x 51".


Next it was time to prepare the binding. I had planned on a solid white binding fabric to play up the floaty-zen feel, but that quickly changed when I pulled out a great Joel Dewberry print, gifted to me by the wonderfully generous and talented Mama Peaches. Once I saw those green and aqua flowers on a sea of navy, there was no going back! It's a perfect match for the quilt and I think it will give it just the right amount of zing. And now I can say quite happily that this little quilt has grown on me. Thank you, Nellie!


And one more picture, because the binding is truly that fabulous!

I'm really hoping to find time this weekend to sew on the binding, but things are pretty hectic. But one way or another, finished pictures will be coming soon!

Sunday, March 17, 2013

Marathon Sunday

Whoops, life intervened and I didn't do any sewing Friday *or* Saturday. But, wow, did I ever make up for lost time today. Thanks to Papa Bee I was able to indulge in a little quilting marathon, and took this WIP from quilt top to quilting in a single day. A few highlights below...

I pieced the back! I had planned the quilt top in advance, but I really wish I had thought about the back a little more. I had almost an entire charm pack leftover, and felt a little overwhelmed by my options (more coins? full squares? a patch work section... patchwork squares on point? Ack!). In the end though, I decided less was more and went with a single row of charm squares... which means I have a LOT of charms left. More fodder for my scrap bin?

For the background fabric, I decided to highlight a sea-green that I found in one of the prints. Bella's "Green Tea" was almost a perfect match. It's not the first time this color came to my rescue either, I used it in my Good Fortune quilt, too. 


I basted the quilt sandwich! Ugh, a fresh reminder why basting is still my least favorite part about quilting. There's never enough room and my back always aches, but at least it's done! Looks like I missed a picture showing the bazillion safety pins and the cat I had to shoo away 100 times. But you can imagine them ;-)


And I started quilting! I experimented with quilting gloves and sped right through a quarter of the quilting in a under an hour. Huzzah! I did sort of compromise on the quilting though, and chose a simple medium/large stipple. In my dream world this quilt would be swirls ALL day long (seriously, it's a beachy quilt, it needed swirls!), but I haven't even tried mastering those yet. Someday though!


10 days to go! I think (I hope!) I'm in good shape, but you never know when you have a toddler! 

Thursday, March 14, 2013

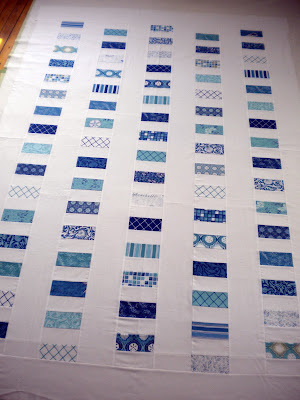
Coming together

Phew, it's been a couple of intense sewing nights, but I am done piecing the quilt top! My goal for the  weekend is to piece the backing and baste the quilt sandwich. Go go go!

Monday, March 11, 2013

Let the Race Begin!

The fabric for my sister's wedding quilt is here! I am definitely playing it a little safe with this color scheme, but I'm pleasantly surprised by how much I like this fabric collection. The navys and aquas are a lot of fun. And, the beach theme is perfect since my sisters and I used to spend a week at the Outer Banks in North Carolina as kids.

Since I'm under a deadline (wasn't this supposed to be a relaxing hobby?) I sketched out my design while I was waiting for the fabric to get here. I don't usually bother with that step, we'll see how it works out.


I fly out March 29th, so I hope to finish this by the 27th. I've bargained with Papa Bee to arrange for a few extended weekend sewing sessions, fingers crossed! 

Monday, March 4, 2013

A Pocket Full of (mini-charm) Posies

My youngest sister is getting married in three weeks (!!!) and I haven't started her quilt. I know there are lots of amazing quilters who could throw something together in a day, but I am not SO not there yet! But I did finally sit down and plan out her quilt -- sort of a modified coin quilt with floating blocks of color. Except... the fabric won't be here until Monday. That leaves me with less than three weeks/two weekends to get this thing done. YIKES!

So, what did I spend my time on this weekend? I did what any rational person facing an impossible deadline would do! I procrastinated by making a completely unnecessary and unrelated project. 

At our last trip to my LQS Baby Bee spotted a mini-charm pack of Aneela Hoey's Posy, and asked if we could make it into a blanket for "Silly Cat." I was all too happy to oblige. Seriously, I was beaming with mommy pride in the store. I decided to keep it simple and pieced this quilt top together Friday night. Basic patchwork like this is so relaxing and wonderful -- perfect after a stressful week at the office.  The mini-charm pack wasn't quite big enough for Silly Cat, so I floated the mini-charms on a field of white and added a generous border.
Posy mini-quilt top. 
 Maybe it was the simplistic quilt top, or the glass of wine I had, but I got brave with the quilting. I decided to venture out of my stippling-comfort-zone and add some wandering clovers. Aren't they sweet? I took Leah Day's "Free Motion Quilting a Sampler Quilt" on Craftsy, and this is the first of her patterns that I'm putting to use. 

Wandering clovers
Free motion quilting does not come easy to me. I really think it's grounded in drawing, a skill that I do NOT possess in the slightest. It took me *forever* to get my stippling even remotely passable, so adding these clovers was nothing short of terrifying. There are certainly clovers in the final quilt that I'm not proud of, but I don't think Silly Cat will complain much.

Nitey-night Silly Cat
I used a large scale print I had in my stash for the backing. It was an older print from the Leanika collection by FreeSpirit that I found at the Fabric Basement for $1.99/yd (!!). It's sort of on the ugly side, but it matched the top really well. And I love the periwinkle binding! Strangely enough I forgot to engage the dual feed on my Horizon, and it was my smoothest machine binding yet. Not sure if I'm getting better, or if the dual feed was working against me, but I'll be experimenting some there.


Most importantly, Baby Bee has been spending her mornings putting Silly Cat back to bed with his new blanket, *instead* of screaming at crying for us to come get her. What started out as a procrastination tactic has certainly turned into a brilliant investment. Who knew? :)

Saturday, March 2, 2013

Rainbows in Winter

This quilt is for a very special lady in my life; a truly amazing friend who has been there through thick and thin. I'm so excited to give it to her and her husband to be! 


I machined on the binding earlier in the week and was able to get outside today for some pictures. I was happy to get some true to color shots; natural light makes all the difference there. Plus it was really fun taking pictures of such a rainbow quilt on a dreary day.  Look how it brightens up this dark little corner :)


The backing is thick white flannel -- so cozy but *such* a hassle. Since it was flannel I pre-washed the fabric (I never ever do that!), but only after I had roughly cut the panels to size. Even though the quilt is just 50 inches across, the backing shrunk 8 inches in the wash! And then I had the hardest time piecing the backing, the damn thing just would not lay straight. And don't get me started on the basting nightmare. But, it is done now, and ever so soft and cuddly. And that serpentine stitch? Love it! The texture is divine, perfect for cuddling!

Overall, I'm really happy with how the design came out (I followed this pattern with a few small tweaks). I had to be a little careful to prevent warping in all those long seams, but it still came together easily enough. The end result  is much more impressive than the time and skill it required. In fact, I've already planned a second one for the toddler in residence. :)