Showing posts with label WIP. Show all posts

Tuesday, October 1, 2013

Summer Solstice Quilt: Lone Starburst

Yeah, so this isn't the "Another Square" block that I had planned on. In fact, I hadn't planned on including a Lone Starburst block at all. But... I found myself with a couple of free hours and had a change of heart. I'm not sure how this block will change my final layout, but I'm happy to have the extra flexibility.


The only thing that was a little tricky for me was knowing how big to cut the pieces for the foundation paper piecing. Here is how I cut mine for anyone struggling with the same issue:

Pattern Piece (templates from craftsy, here)
Fabric
1A/B
Cut 8
3" strips, then cut into 60 degree diamonds 
(this was a little tight)
Color


2A/B + 3A/B
Cut 16
1.5″ x 4”
White
4A/B + 5A/B
Cut 16
1.5" x 5"
Color
6A/B
Cut 4
5" x 5" squares, then cut diagonally
White
7A/B 
Cut 4
6 x 6" squares, then cut diagonally

White


I started this quilt without any foundation paper piecing experience, and today I managed to make one of my all time favorite blocks. I am so proud of myself for conquering this one!  Like the Arkansas Traveler block, the Lone Starburst feels like a real milestone. I can't wait to make another one! I'm already planning a scrappy rainbow with fussy cuts. No idea what I'll do with it, but I absolutely have to make it :) 

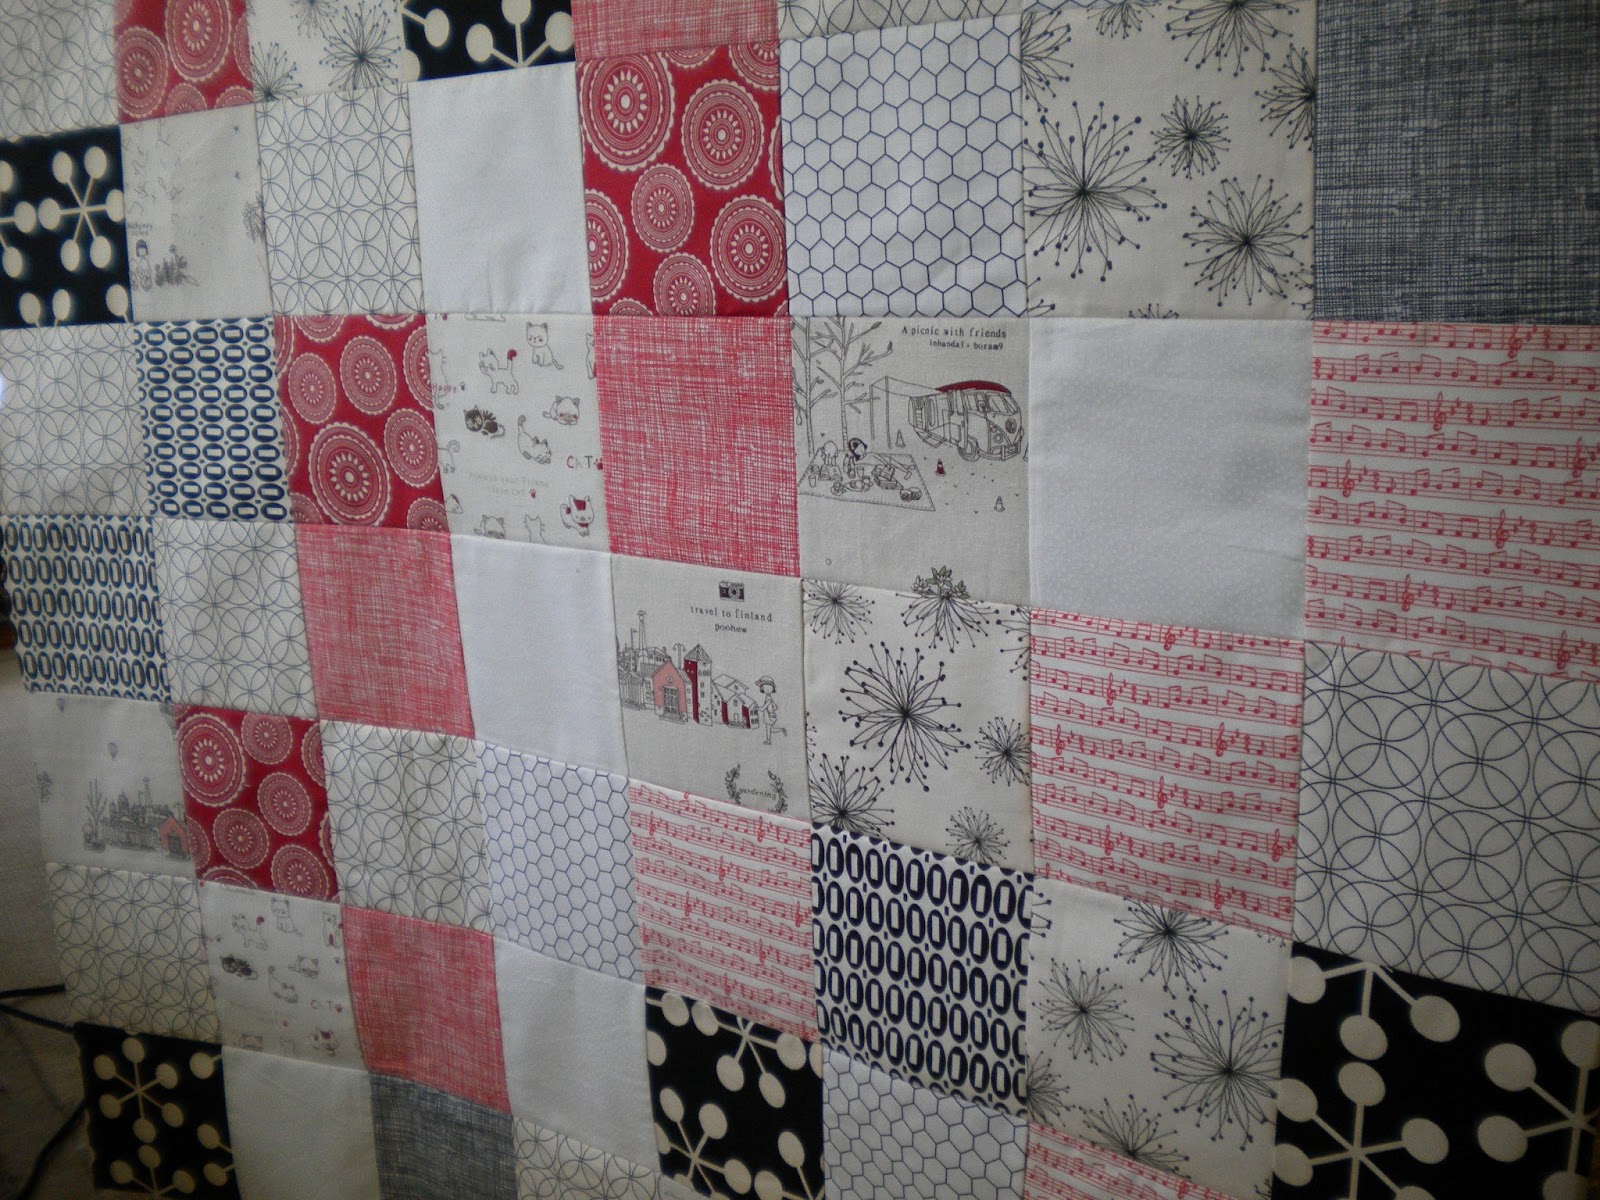
And, lastly, a little progress shot. These colors are outside of my usual color palette, but they remind me so much of my sister. I'm so excited to give it to her. Three more blocks to go (for real this time)!

Linking up with WIP Wednesday's at Freshly Pieced.

Thursday, September 19, 2013

Summer Solstice Quilt: Evening Star

I was finally able to get back to my sewing machine this week. It felt so good to add another block to my Summer Solstice Quilt, this time the Evening Star.


This block led me to this quilt's color scheme, so I'm really happy that it turned out just as I imagined. The color transition from yellow to grey makes me smile every time I look at it. But then again, I'm a sucker for rainbows, no matter the color palette :)

The most difficult blocks in my Summer Solstice Quilt are behind me now. In fact, here are just three blocks left and only one of them involves paper piecing. It feels especially good to be making progress since this one has been in  the works for awhile.


My next star is appropriately titled "Another Star." I've spent hours agonizing over the color selection. I even stole the toddler's crayons and experimented with the blocks, but I still can't decide. Hopefully I can pick a direction and work up the courage to cut the fabric soon!


WIP Wednesday at Freshly Pieced


Wednesday, August 21, 2013

WIP Wednesday: Teacher Appreciation Edition


I am fortunate enough to have my daughter enrolled at a fabulous preschool just a few minutes up the road. She spends her days playing *hard* under the watchful eye of four amazing teachers.

In just a few weeks we'll be moving up at school, but I wanted to give each of her teachers a token of our appreciation. So this week I'm taking a mini-break from my Summer Solstice Quilt, and starting a few "quilt as you go" panels. I haven't settled on exactly what I'll be making with them. Pencil bags? Makeup bags? Gift card holders? Yeah, something like that.

This isn't my first time using the quilt-as-you-go-technique, but I think I've improved since my first mis-adventure. I took Tara Rebman's "Quilt-As-You-Go-Bags" on Craftsy, and picked up a lot of great tips there. I just love projects like this - lots of improv fabric play, and a great excuse to visit the scrap bin. I'm excited to pull colors for the next two bags!

Linking up with WIP Wednesday at Freshly Pieced :)

WIP Wednesday at Freshly Pieced

Monday, August 12, 2013

Summer Solstice Quilt: Arkansas Traveler

I fell in love with the Arkansas Traveler block the very first time I saw it over on Freshly Pieced.  Since then I've seen so many beautiful versions pop up in the blogosphere, but I knew I needed more experience before I attempted it myself. Paper piecing and diamonds -- whoa. I feel like I've been practicing for this very moment for months. Well, ready or not, I went for it!

As you may know, the Arkansas Traveler combines traditional piecing with paper piecing. You begin by cutting 60 degree diamonds (measured to the eighth of an inch!), and assemble them in groups of four. I went through a lot of layout variations in my head, but in the end I went scrappy.

This was my first time doing diamonds, but it was easier than imagined. I used my Perkins Ruler to show me where the scant quarter inch seam would fall, and used that to gauge where the dog ears should go. That seemed to work really well for me. I definitely still had to pay attention when lining up the diamond sets, but I only had to rip out a few seams.

Once the diamond sets are complete, they are set into the background via paper piecing. I'm happy to say that paper piecing came more naturally this time, and passed more quickly. It took me just a few minutes to do the paper piecing and trim up my four mini-blocks.


Matching up the points was definitely the toughest part of this block. I'm happy to say that my little Janome was able to push through the center seam with the papers intact. Thank you, Acufeed. That's a lot of fabric and a lot of paper, but we chugged through it.

Unfortunately, it wasn't until I matched up all the seams that I realized I had an error in one of my four mini-blocks. See that one in the upper left of the finished block? The paper must have slid on me while  I was paper piecing that bit. By the time I noticed it was way too late to fix.  I'm a little disappointed, but my sister made me promise not to go crazy making her quilt. So I'm resisting the urge to rip it all out and start over. Have I mentioned that my sister is amazing? Because she is.

Here's a little status shot of my three blocks so far. I'm really pleased with how it is turning out!


Linking up with WIP Wednesday @ Freshly Pieced, which seems extra appropriate this week. I can't thank Lee enough -- this really is an amazing block, and it comes with a perfectly clear tutorial. Always an inspiration.

WIP Wednesday at Freshly Pieced
 

Wednesday, August 7, 2013

Summer Solstice Quilt: Ribbon Star

WIP Wednesday at Freshly Pieced


This week I finished the second block ("Ribbon Star") in my Summer Solstice Quilt. Not going to lie - even though I'm in the middle of this project, it's hard to keep myself focused on it. I keep getting distracted! So, I'm linking up with WIP Wednesday at Freshly Pieced to keep me moving forward.

This particular block wasn't too challenging, which was nice change of pace after sewing up that tricky dragon softie. The block definitely came together quickly and easily, thanks in no small part to my new Perkins Perfect Piecing Ruler. I can't say enough good things about that fluorescent yellow beauty. Love love love!


It's nice to see the color palette starting to emerge with this second block, and I've really been enjoying working with the Art Gallery's Pure Elements. They are so soft!  


My next block is the Arkansas Traveler, which will be a bit of a sewing milestone for me. I've admired that block for a long time, and can't wait to tackle it. Wish me luck!

Friday, July 26, 2013

Making My First Dragon Softie

You may be familiar with the now classic "sleeping baby dragon pattern" by Naomi @ NimblePhish. You can find sewists selling dragons made from the pattern in the $100 range all over the place on Etsy and Facebook. I love the pattern, and hope to make it one day for an adult recipient since the appendages are all sewn by hand (using a ladder stitch or button joints). The resulting dragons are gorgeous, but I would fear for their safety if they ever met up with my two year old.

So, you can imagine my excitement when I heard that NimblePhish was introducing a new toddler-friendly dragon, "Doughnut." Unlike his older brother, Doughnut is entirely machine sewn in a single structure (except the wings). I picked up the pattern in a heart beat, and pulled out some dark purple cotton velour that I had been holding on to. About twenty-seconds in to pattern cutting I realized that cotton velour is a delicate beast, so I applied fusible fleece to each piece (for the record, that step takes forever!). Then I added a few splashes of corduroy in lime green and orange for contrasting details. Finally, I ended up with a beautiful pile of pieces.

And then came a sewing extravaganza, which actually took place a few weeks ago before our home renovation projects. The sewing went smoothly once I got his feet sewn on in the right direction, but I would certainly consider this little guy an intermediate level pattern. There are some tricky seams, and generally very little detail or explanation. But, that said, anyone with modest sewing experience (or a lot of drive!) could make their way through this one.
Even though I finished his "skin" awhile ago I wasn't able to stuff him until now, thanks to the arrival of new eyes from 6060 and a new batch of wool stuffing. Unfortunately, while I was stuffing him I realized that something was funky. As you can see, he is a little slimmer and a little taller than the pattern picture. My best guess is that I misinterpreted the cross-grain/length-wise symbols on the pattern pieces, and ended up putting the stretch in the wrong direction. Easy enough to do since I was also compensating for the nap direction. But still, argh. Add in the fact that he is/was intended to be a special birthday present for an amazing friend's son next week? Double argh.
I debated sending him to the Island of Misfit Toys, but thought better of it (for now!). I've been assured that he is presentable, just different than planned. 

Even so, I decided to add a little more personality and charm where and if I could (read: I lay awake for hours trying to figure out ways to redeem him) So, I fashioned a snap-on diaper for him, and made a cut-out for his tail. I also added sleepy eye-lids, which are a feature in NimbleBit's other patterns. And lastly, I added a little bling to his under-wings in the form of dark purple silk. I had to hand-baste the wings before machine sewing, top-stitching was a @%&$@$ challenge, and the silk didn't photograph well, *but* it feels lovely. I think little hands will love it. But for my sanity's sake, I'm never ever sandwiching (real) silk and cotton velour together again. I promise you that much.


But for now, he is done, though I might decide to pin his ears down. I am probably going to vacillate between exiling him to the Island of Misfit Toys and giving him as a gift about a dozen times between now and next week.  It stinks when you work on something and it doesn't come out how you expected. Especially when it's a gift for someone special. I'm hoping that he'll grow on me if I just step-away. Step away! :)


Wednesday, July 24, 2013

Summer Solstice Quilt

I'm officially dubbing this WIP the "Summer Solstice Quilt."  As I mentioned in my earlier post, my plan is to combine several stars from Faith @FreshLemon's Summer Sampler and Solstice Stars Series. See what I did there? Summer Solstice Quilt. Mmm hmm.

Well, after weeks of procrastinating I finally broke ground on my project. This was my first time foundation paper piecing, and I was so intimidated! I am a creature of habit and paper piecing seemed completely counter-intuitive.  I'm happy to report that everything went smoothly  despite my worrying, and I had a lot of fun! I think paper piecing might be my new favorite thing -- it was so satisfying to watch the little bits come together.


My first star in my Summer Solstice Quilt is the Star of Mystery. I am so thrilled with how it came out! Unfortunately, I'm having a tough time getting a photo that is true to color. The midnight navy is reading as black... maybe my camera is trying to tell me something about 2AM photo shoots.

I will say that this block was hugely time consuming. It took an hour and some change to cut the pieces, and then another couple of hours to complete the various sections. After investing all that time I decided to baste the segments together first -- just to make sure that  my points matched before joining them more permanently. I think the extra step paid off :)

Star of Mystery, all finished!
I'm feeling reinvigorated on this project. I can't wait to start up my next block!

Linking up with Freshly Pieced and WIP Wednesday!

WIP Wednesday at Freshly Pieced

Sunday, July 7, 2013

New Quilty Work in Progress


I may have bitten off a little more than I can chew on this one. I am in love with my plan, but more than a little intimidated. I've spent weeks procrastinating by sewing up small projects, but it's time to get serious (or at least try!). So, I have finalized my fabric pull, and am hoping this post keeps me a little more accountable progress-wise. I'm going to use a mix of navy, grey, golds, and teal/aquas. The fabrics are mostly Art Gallery's Pure Elements, with a few others here and there.

My mission is to create a series of seven different stars, four of which are paper pieced (first time paper piecer here, yikes!).I'm going to be using a mix of stars from the Solstice Stars Series and the Summer Sampler Series -- both of which were quilt-alongs hosted by Faith @ FreshLemons. I have every confidence in the tutorials (Faith's "Lemon Squares" pattern was my first big quilt, and was a pleasure to sew through), but I'm feeling much less confident in my abilities.

To help procrastinate build my confidence, I've spent a lot of time organizing my project within Evernote. If you've never used Evernote before, I highly recommend it. It's a great tool for saving web-clippings for future reference, or keeping a running catalog of just about anything at all. Since my new project contains seven separate tutorials (and another dozen paper piecing templates!), I created a "master" page that includes cutting directions for each block, and links to the tutorials/template for each block. I also created a visual for myself so I can keep track of all my blocks. I've included a little screenshot below:


I'm a very visual person, so I think it is so useful to have all these things at my finger tips while I craft. Ok, here we go. Time to get cutting!


Thursday, June 13, 2013

Curves Made Easy (or at least easier)

I have two charm packs (one of them is 2wenty Thr3e! I just love that line!) that I want to make into cathedral window-like pillows, but without all that ironing and top-stitching. Not to mention the fabric waste. You know, easy-peasy piecing (except for all the curves and perfectly matching points)?

So I broke out my Robbing Peter to Pay Paul die from Sizzix for the first time and painstakingly pinned along each seam. And I finished a block. Yeah. I'm not posting a picture of what that looked like, and for good reason. Granted, I didn't try that hard, but it was way too time consuming for a four inch block (3.5 finished, yikes!).

Enter the Curve Master Presser Foot. Careful if you google it (ask me how I know). Thanks to Amazon Prime, my foot arrived in two short days.

And then it was time to play. I installed the foot, which was able to snap-on to my Janome without any of the ankle adapters that come with the package. Initially, I was a little worried because my needle comes down in sort of a strange place on the foot, but it seemed to work just fine regardless.I will try to get a picture to add for the visual.

And then I cut out all the little shapes in two seconds flat thanks to my Sizzix. Bonus points since one charm square can produce three of the half-oval shapes.


And I started sewing all those beautiful little fabric bits together.  It is going to take a little practice, and it won't ever be as easy as patchwork, but it is completely manageable. And the results are pretty great. This little block took me about 10 minutes from start to finish, isn't it cute?


Even though this worked really well, I have to shelve this project for now. My fabric diet is over (yay!) and I have some serious quilting to get started on. And I have some doll clothes (long story for another blog post) that need making ASAP. More soon!

Wednesday, May 22, 2013

Wombat in Progress & Proof that Fifty is Cool

My step-mother is turning FIFTY this weekend. We'll be celebrating in style with an all day party, but I wasn't sure what to do gift-wise. So I asked. And you know what her birthday
request was? A wombat to call her very own. Yep, she's cool.

So, I'm stuffing (and stuffing... and stuffing) this evening. Her head is taking shape nicely.  BabyBee is, of course, helping me. Every teeny-tiny bit of stuffing in the wombat has been subjected to a full on hug-assault. Let it also be known that Baby Bee has strict quality control standards. Wool stuffing might be prone to minor imperfections, but she's made sure to remove any "suspicious" tufts (read, "too curly" or "too yellow"). Only the best for Grammy.

And in between all her helper-duties, BabyBee is hosting a lovely tea party for her friends. 

 Life is definitely good. Very good.

Sunday, May 5, 2013

Patchwork in progress

Just a quick sneak peak of what I'm working on... simple, peaceful patchwork:


I plan to have this one finished up for a baby shower this weekend. More to come!

Friday, March 22, 2013

A Good Day

Today was a rare treat -- an entirely child-free day off of work! I sewed my little heart out and loved every second of it!

With my deadline looming I focused on my seascapes quilt. I finished the quilting first thing this morning and then squared things up. Once it's all trimmed up, you can really see the finished product  coming together. The whole process leaves me a little giddy :) And I was pleasantly surprised with the finished size on this one-- a pretty generous throw at 72" x 51".


Next it was time to prepare the binding. I had planned on a solid white binding fabric to play up the floaty-zen feel, but that quickly changed when I pulled out a great Joel Dewberry print, gifted to me by the wonderfully generous and talented Mama Peaches. Once I saw those green and aqua flowers on a sea of navy, there was no going back! It's a perfect match for the quilt and I think it will give it just the right amount of zing. And now I can say quite happily that this little quilt has grown on me. Thank you, Nellie!


And one more picture, because the binding is truly that fabulous!

I'm really hoping to find time this weekend to sew on the binding, but things are pretty hectic. But one way or another, finished pictures will be coming soon!

Sunday, March 17, 2013

Marathon Sunday

Whoops, life intervened and I didn't do any sewing Friday *or* Saturday. But, wow, did I ever make up for lost time today. Thanks to Papa Bee I was able to indulge in a little quilting marathon, and took this WIP from quilt top to quilting in a single day. A few highlights below...

I pieced the back! I had planned the quilt top in advance, but I really wish I had thought about the back a little more. I had almost an entire charm pack leftover, and felt a little overwhelmed by my options (more coins? full squares? a patch work section... patchwork squares on point? Ack!). In the end though, I decided less was more and went with a single row of charm squares... which means I have a LOT of charms left. More fodder for my scrap bin?

For the background fabric, I decided to highlight a sea-green that I found in one of the prints. Bella's "Green Tea" was almost a perfect match. It's not the first time this color came to my rescue either, I used it in my Good Fortune quilt, too. 


I basted the quilt sandwich! Ugh, a fresh reminder why basting is still my least favorite part about quilting. There's never enough room and my back always aches, but at least it's done! Looks like I missed a picture showing the bazillion safety pins and the cat I had to shoo away 100 times. But you can imagine them ;-)


And I started quilting! I experimented with quilting gloves and sped right through a quarter of the quilting in a under an hour. Huzzah! I did sort of compromise on the quilting though, and chose a simple medium/large stipple. In my dream world this quilt would be swirls ALL day long (seriously, it's a beachy quilt, it needed swirls!), but I haven't even tried mastering those yet. Someday though!


10 days to go! I think (I hope!) I'm in good shape, but you never know when you have a toddler! 

Thursday, March 14, 2013

Coming together

Phew, it's been a couple of intense sewing nights, but I am done piecing the quilt top! My goal for the  weekend is to piece the backing and baste the quilt sandwich. Go go go!

Monday, March 11, 2013

Let the Race Begin!

The fabric for my sister's wedding quilt is here! I am definitely playing it a little safe with this color scheme, but I'm pleasantly surprised by how much I like this fabric collection. The navys and aquas are a lot of fun. And, the beach theme is perfect since my sisters and I used to spend a week at the Outer Banks in North Carolina as kids.

Since I'm under a deadline (wasn't this supposed to be a relaxing hobby?) I sketched out my design while I was waiting for the fabric to get here. I don't usually bother with that step, we'll see how it works out.


I fly out March 29th, so I hope to finish this by the 27th. I've bargained with Papa Bee to arrange for a few extended weekend sewing sessions, fingers crossed! 

Monday, February 18, 2013

Found: binding perfection


Ok, maybe not quite binding nirvana. I do wish the stripes were a little narrower, but it's surprisingly difficult to find black and white stripes. I'll certainly be keeping my eye open for some new stripes to stock up on.

And now this quilt is backed (with cozy flannel!), the basting is done, and a fancy new serpentine stitch has been programmed into my Janome. Quilting soon!

Monday, February 11, 2013

Undercover mission

2013 is filled with some very exciting weddings. Both of my sisters and one of my very best girlfriends are getting married. Obviously, these are some very important people, and I'd love to make each of them a wedding quilt. But time! Time is not my friend!  And yet, somehow, in the middle of the Blizzard of 2013 I was able to get one of the quilt tops done.

I had pre-ordered a jelly roll of Simply Color by V and Co. for Moda, but then proceeded to stare at it for months. It was nearly impossible to take it out of its wrapping --  it was so perfect all wrapped up! But then, Saturday morning I woke up to thirty (30!!!) inches of snow outside my window and (I kid you not!) a four foot snow drift against the front door. My whole body must have screamed "rainbows, now!" because  I overcame my fear of the world's-most-beautiful-jelly-roll pretty quickly  :)

I started with Cluck Cluck Sew's "Strip and Flip" pattern, but made a few modifications.  Inspired purely by laziness I used  2.5 inch strips, instead of 2 inches.  In keeping with the slightly larger scale, I used 2 inch strips for the white vertical lines. And lastly, I added on quite a few extra strips to the top and bottom to make the quilt lap size --  my final quilt is 48 x 66 inches or so.

I definitely spent a good amount of time obsessing over which strips would go where. It was pretty tricky to arrange them so that there was a smooth color transition, while also balancing darks and lights.  I'm really happy with the final layout, though there were a few happy accidents that happened in the "flip." See how the orange chevrons meet up with the purple chevrons? I wish I could say that was planned or a stroke of genius, but it wasn't :) It's so cheery and happy, just like it's future owner. I can't wait to give it to her!

Now I just have to find the perfect binding/backing... and make sure this quilt stays a secret! 

Monday, January 28, 2013

Trollish Delight

Remember troll dolls? You know, those multicolored dolls that were so impossibly ugly that they were almost cute? Well, I'm proud (and a little bit horrified!) to say that I've made something with that very quality. Three cheers for the kitschy thread catcher!

I am kitschy, hear me roar!

I made this little box to practice Oh Fransson's quilt-as-you-go-technique. Sort of a trial run *before* cutting into my beloved Japanese fabrics. It was a lot of fun, though a little work intensive for an experiment.  If you haven't try this technique I highly recommend it. I plan to finish it off with a dark grey lining, and maybe even some (lime green?) piping up top. These things require a trip to the fabric store, so it's shelved for now.

Oh, and did I mention this thing is 6 inches square? That's a lot of thread. I'm setting the bar high, but I think I can fill it!

Friday, January 11, 2013

Good Fortune Throw Pillow

This throw pillow is my latest work in progress,  inspired by Fabric Mutt.  What can I say, I'm sort of a sucker for rainbows.

Even though it's pretty simple, this is the first thing I've ever made without a pattern. It's coming together quickly and even used up some of my Good Fortune Quilt scraps.  Now to find the time to finish it up!

Friday, January 4, 2013

Lessons Learned

I hit a snafu with the binding...I realized *way* too late that I hadn't squared up the quilt very well and there were a few places where the binding "missed" the quilt top. It took me four days to rip out some 6,000 stitches (!!), but now that it's done I'm glad that I took the time to re-do it. Also, instead of doing the back by hand I followed Red Pepper Quilt's machine binding tutorial. It's a little tricky, but I finally got the technique down in the end. The result is super sturdy -- with two cats, a dog and a toddler this quilt will be no stranger to the washing machine :)

Machine Binding - Red Pepper Quilt's Style